The Act of Creation – Kill of the Night, Post #4

Well, it’s been a while since I’ve posted on my progress creating the dance for Kill of the Night.  Some updates:

I’ve never documented my progress on a dance before, and I tell you, I’ve learned a lot from this.  The experiences during this process weren’t new to me, but really looking at how I get from point A to Z, no sugar coating, no excuses is really mind opening.

I think when I started writing about the act of creation for this dance, I had 2 weeks before the first practice.  TWO WEEKS.  Now, that wasn’t because of crazy deadlines for the show, that’s because that’s when I started to get serious about it.

Lesson #1 – yes, I’ve had amazing dances come together in days.  That’s the exception.  I have a horrible habit of underestimating how much time something will take, and assuming everything will flow smoothly.


creative process foff

Don’t do this! ~ experience

Ok, two weeks is the time I allowed myself.  For a dance, at a venue where I always push myself and where the show is a cohesive story told through all the acts.  Some of my most creative breakthroughs have been for this venue and have always taken an extreme amount of time as I push my limits and smash through them.  Yeah, two weeks…uh huh.

Lesson #2 – when planning how long a dance will take, also look at the complexity of the dance.  This one actually has two pieces of music and basically two separate dances that have to be stitched together, along with the choreo, the movers, etc…because it will be one routine in the end.  That alone could take a week to do right and test it thoroughly.

Well, after some creative blocks, bumps in the road, and days I just had no ambition to work on dance, I finished the choreography.  Overall I’m really happy with the choreography.  I know it will need some tweaks and I will change it a bit to reflect what’s going on with the set (like climbing up the ladder).

Lesson #3 – make a rough schedule of what needs to be done, penciling in when you’ll hit those checkpoints for finishing pieces of the dance, like picking animations, roughing out choreo, building the set, finalizing the costume.  I didn’t make a schedule of things to do.  I had a list, but time easily slips away without a timeline.  Don’t make it so rigid that the schedule feels like work or creates anxiety….but it’s good to have checkpoints or a roadmap so you don’t get stuck along the way.

Funny story – when I was choreographing one of my first dances ever, I was doing a song to Grease – set outside where some of the dancers were sitting at lunch tables.  I spent three days getting the lunch trays right.  I even contacted the creator of the milk carton on a lunch tray because it wasn’t mod after rezzing the lunch tray.  Everything else was, but not the milk carton.  Three frickin’ days…on the lunch tray!  Seriously.

While I worked on Kill of the Night, I had to keep fighting the feeling of being overwhelmed…which is the worst thing ever and sucks your creative juices right out of you.  It really wasn’t that I had too much on my schedule because other than some DJing and workshops, I’d taken May off.  It was that I set too tight a time frame for this dance, didn’t have a timeline, and didn’t remain focused.

I love when I’m in the rhythm of creating and can lose myself for hours.  Other times, it’s really intense bursts and I need to take a break, like a car with the rpm’s up near the red line.

Lesson #4 – plan into your timeline extra cushion so you can take creativity breaks when you need them.  A car can’t constantly run at max rpm’s, and neither can we- especially creatively.

Where am I now?  The set is done, choreo, mover work for the dance part.  Am I happy with it? It’s not all it could be.  The audition part I’m really happy with, I’d pretty much finished that 6 weeks ago.  I do still need to stitch it together.

Unfortunately, the show has been postponed for now due to things not related to SL directly.

My first thought when I heard this, after concern for the situation?  Yay, the pressure is eased off.  Second thought – that kind of thinking is what gets me into pressure situations.  There’s no reason my act can’t be the best it can be and completely ready for when the show is rescheduled.

Lesson #5 – if you are given a time reprieve – it’s not summer break!  Keep working and finish it.  If you’re not happy with it – keep working and get it right!  People will remember most the performance they just saw from you.  If it’s half-assed, people will notice.  They could even take it as lack of respect for the venue, or for the other choreographers who put their all into the dance and met their deadlines.

Ouch.  That one hurts, but it’s true isn’t it?  If I didn’t have any RL issues (which should always take precedence), and I didn’t meet my deadlines, isn’t that kind of disrespectful of others?  (talking to myself here…).  I’ve am so very grateful to those who have been patient with me, especially when there have been RL things going on, but I realize my responsibility too now and perhaps what my own actions say to others.

Lesson #6 – plan to have your dance completely wrapped up at least one week before the show, preferably the first practice if possible.  This gives extra cushion to tweak and reduces stress on performance day.

Some shows and venues will start practices two weeks before the show, so you might not have it completely wrapped up but hopefully close.  Some of my biggest dance glitches have been because I’ve run working on my dance up to the wire or hadn’t tested thoroughly.

I believe that to improve, sometimes we have to take a really good look at ourselves and really be honest with ourselves.  Sometimes, we are the biggest obstacle to achieving our goals and dreams.  If we face things head on, we can learn and hopefully break through and find satisfaction and success, however you define it.  I believe success, that feeling, comes from within, not from the outside.

I’m not beating myself up and I forgive myself for things I could’ve done better – that’s an unexpected benefit in doing this.  I will be the last person ever to say I’m “perfect” or “the best”.  Always striving and growing!  Just the way it should be in my book. 😉

I’m finding that I truly am deadline focused, motivated, but right now it’s the drop dead deadline…not such a good thing.  Lesson #6 will help, and my determination to stick to it.

Now what…

I’m still working!  I’m going to sit down this weekend and draft out a timeline with what I want to fix to make the dance all it can be.  I want it to be done, ready, and proud of it from the first performance!  I’m still really excited about this dance.  It’s funny to me, in sharing my method of creating this particular dance, it has instead I think (or hope) it has become a case study in a way….with lessons to take away from it.  I’ll keep posting on it now and then.

I’ve decided to use a new dance to blog my flow in creating.  This one I’m hoping to perform July 13th – 6 weeks away.  It’s not officially on the calendar yet, but I’m pretty sure I’ll be able to get that date.  Keep your eye out for the first post on Blind and Frozen!

Dance, creating a dance, in SL is truly so much more than just the performance isn’t it?

Creatively and respectfully yours,

~ Eva

Posted in Act of Creation | Leave a comment

Spot On Sync – Starting Your Dancers Backstage

* Pictures coming soon

One of the strengths of using multiple pieces or a complete system is the ability for the tools to coordinate with each other.  For this post, we’re breaking down the benefits of using “Backstage Movers” and how to do it.

If you are using Spot On tools and not using backstage mover notecards, these are the three most common scenarios I see:

  • Movers rez onto the stage with the set.  Your dancers jump on during your intro music.  Sometimes they can’t find them, their screen freezes, or they are momentarily distracted.  Not only can this create undue stress on you as you anxiously await for all your dancers to find their movers, but it also creates stress for the dancer.  They know the work that goes into creating a dance and do not want to delay the start as they sift through the objects on the set to find their mover.  This is an additional challenge for those with vision impairments.
  • Movers rez backstage with your set.  Your starting point is backstage and when you hit play they are whisked into position onto the stage.  Because being whisked onstage is part of the performance, you can’t open the curtain early with the dancers already in place.
  • Movers are rezzed out early backstage, manually put into the right position.  This is the starting point and when you hit play they are whisked into position, similar to above.

What are backstage movers?

You may hear them called many names – backstage movers, backstage routines, “pads are out”, etc.  Basically what this is, is an additional notecard you add to your movers and an additional routine notecard you add to your Performance Director.

Whenever you load a routine in the Performance Director, it automatically triggers the movers to move to the starting position for that dance routine.  In this case, the “starting position” for your “backstage routine” is behind the stage.  This allows you to have your movers out early, for your dancers to jump on them early, and for you to even be able to precache your animations before you even go onstage.

They aren’t really extra movers, it is technically an extra routine that let’s you move your movers backstage.

Why do this?

With the evolution of tools, we have additional options that can help reduce the anxiety of performing for both you and your dancers.  By using Backstage mover and PD routine notecards, you can have your movers rezzed out before the show, your dancers can jump on their mover early, and you can cache and check your PD well before your intro starts playing.  You can also move your dancers onstage during the intro, and when you open the curtain they are in position – no whisking them on while the curtain is open, or opening the curtain after you’ve already pressed play.

How the Spot ON TOTS (trio of tools) work together:

Performance Director – when you activate a routine (by clicking on it), it communicates with the notecards in your movers – telling them which routine to load.  The PD can contain multiple routines in one HUD.

Choreo Designer Mover – can include mover notecards for up to 10 routines.  When the PD tells the mover to activate a notecard, the mover moves to the starting position for that routine.  How?  In the mover notecard for each routine, there should be “offset” information at the top.  This is basically the starting position for that routine.

Stage Manager – based on the Stage Locations notecard in the contents, it knows the center point of every stage.  If you create your mover notecards with an active stage manager nearby, it will include the starting position for the dance you’re creating (the offset part of the mover notecard).  When your stage manager is active at a venue and you rez your movers  and activate a routine, it also acts as a homing beacon – telling each mover “you belong (offset) away from this center point on the stage”.

Assumptions:

You have your dance completely done.  Maybe you’ve choreographed a bit of sexy Justin Timberlake or umm…some dwarfs.

You have your Performance Director HUD ready.  Your dance notecard is in there with your choreography, dancer groups, and animations.

Your movers are done, the named notecard for your dance is in each mover for each dancer.  Your dancers start onstage or wherever they should be for the start of the dance.  Maybe they’re on the side of the stage and will walk in during the music or maybe when you open the curtain they’ll be posed in the center of the stage, etc.

You have your Stage Manager set up with the stage location.  When you created your mover notecards, your Stage Manager talked to the designer ring and the mover cards for your dance have the offset information in them.  Your movers know exactly where to go when you load your dance routine.

So – what do we want to do?

You want your dancers to be able to jump on their movers early and you want this “waiting area” to be a bit out of the way behind the stage.

You also want to be able to move your dancers from backstage onto the stage for your performance during your intro music as easily as possible, and after the performance move them offstage as quickly as possible.

First – where do you want your dancers to stand backstage?

Most venues have a similar layout – the stage area, a wall, and the backstage area behind it.  This makes using backstage movers even more convenient because you can generally use the same back stage spots for every venue with a similar setup.

You generally don’t want your dancers standing right behind the stage wall in the middle – this is often where traffic jams occur and the next dance to go on will always “win” that spot.  (No brawls over turf, please!)

Because you can cache your animations early, it is good to have your backstage area be somewhere near the center behind the stage.  Maybe a bit off to the side, up above people’s heads, or back a bit farther – closer to the back wall.  The audience viewers (like Firestorm) can still “see” your animations even if the audience can’t.  You want to lift them off the ground at least a little bit.  Some venues might have a carpet on the floor.  By lifting them up just a bit, your movers will still be visible at the various venues you perform at.

Chose where “your” backstage area will be for your backstage movers.

Second – creating your backstage mover notecards

Now we need to create a “route” for each of your dancers.  We need a mover notecard with at least one waypoint and the offset information.

Rez out a designer ring for dancer 1 in the backstage area you chose.  Now add 1 waypoint to the ring.  You can either repeat this process, or shift-copy so that you have a ring and a standing space for each dancer – usually side by side.

Now we need to get this information and put it into a mover notecard along with the @spot_dancer number.  This is critical – your Performance Director needs to know which dancer is sitting on which mover, even backstage.

** Because we’re actually going to be putting these notecards into your finished dance movers, save the mover notecards in your inventory.   The notecards name needs to match the backstage routine notecard name exactly, and they all have to have the same name, so I store them in folders:

Folder:  Backstage Mover Notecards
subfolder:   Dancer 1
subfolder:   Dancer 2
subfolder:   Dancer 3

Now we are ready to create the notecards.  However you want to copy/update/create your notecard, there should be one in each dancer folder and it should look like the examples below.  (You can use the extra options like @text Dancer 1, etc. if you want to.)

For each of your backstage designer ring, click on “Get Notecard” and paste this information into the appropriate backstage mover notecard in your inventory for each dancer.

Examples:

@text dancer1
@spot_dancer 1
@silent_mode

#BEGIN NOTECARD
@pos_offset <-14.10219, 2.34153, 0.12402>
@rot_offset <0.00000, 0.00000, 0.00000, 1.00001>
<0.000000, -0.000004, 0.000000>, <0.000000, 0.000000, 0.000000, 1.000000>, 1.000000, 0.000000, 0, 0,
#END NOTECARD

*****

@text dancer2
@spot_dancer 2
@silent_mode

#BEGIN NOTECARD
@pos_offset <-14.10219, 3.20745, 0.12402>
@rot_offset <0.00000, 0.00000, 0.00000, 1.00001>
<0.000000, 0.000000, 0.000000>, <0.000000, 0.000000, 0.000000, 1.000000>, 1.000000, 0.000000, 0, 0,
#END NOTECARD

*****

You can now delete the designer rings – you won’t need them anymore.

Add your Backstage Position mover notecards to your dance movers

For each of your dance movers, add the appropriate Backstage Position mover card to its contents.  Make sure that your dancer number 1 gets the backstage mover card for dancer number 1.  Your movers should now have at least two notecards – the named mover notecard for your dance, and the Backstage Position mover notecard.

Creating your Backstage Position routine notecard

You’re not going to actually perform it (unless you wanted to give the backstage crew an extra little show), so let’s keep it really simple.

This is an example of a Backstage Position routine notecard:

@anklelock
@button1=SHOUT:42:SET NAME
@button2=SHOUT:42:clearstage

@group All|1,2,3,4,5,6,7,8|Backstage

For my backstage routines:

  • My buttons are set so I can rez and de-rez my set for caching before the show.
  • I have one group for all of my dancers
  • I have a special “backstage” pose animation I always use as the idle/default animation for the Backstage Position routine.  If a dancer isn’t standing in that pose, I automatically know they aren’t on my HUD.  (the backstage pose is just a pose I renamed – nothing special)
  • There’s no actual choreography, I just want my dancers to stand backstage.

Save the Backstage Position routine notecard to your inventory in another subfolder and then copy it to your dance Performance Director HUD.


Ready to put this into action!

Rez your mover from your inventory if you haven’t already.  On your Performance Director HUD, press the Backstage Position routine.  You should see your mover move into place backstage.

Stand on your mover.  You should be in your backstage pose.  You can now cache all animations if you choose to.

When you hear your intro music and the stage is clear, press the name of your dance routine on your PD hud, loading it.  Your mover will automatically move to your dance starting position – bringing you along with it.  It generally takes less than a minute for your notecard to load and for you to be moved into position.  (Be patient.)

You can now cache your dances for the routine.  When you are ready, open the curtain and press play on your HUD just as you normally would.

After your dance, close the curtain, clear your set, and press the Backstage Position routine on your HUD.  Your dancers will be brought back stage automatically.

Whoa – I know what you’re probably thinking!  What happens if one of my movers gets lost rezzing them like this?  Can I still put them in the Stage Manager because I’m more confident having them packed and rezzing out with the set?

I completely understand!  When I first began doing this, I’d ack my movers into a different rezzer – then I realized that I could just rez them out on the floor.  But what happens if a mover disappears?   Step 1:  Press your Backstage Position routine on your PD – this will usually call them back into place.

Having emergency backup plans are always an excellent idea, and can apply whether you rez from a rezzer or from your inventory!

Options:

  • Delete the mvoers that are out and re-rez a soft linked copy of your movers from your inventory folder
  • you could also store your movers in your inventory twice – once as the soft-linked copy with them all together and also have a copy of each individual mover so you can rez just one
  • I also make a “backup” box when I’m creating a dance, which I save in a different inventory location and in-world just in case I lose my “Dance” folder.  I could rez that and get the copy of the movers out of there
  • You can put them in your Rezzer too!  If you like to have everything all packed up together, go ahead and put them into your rezzer.  For the Stage Manager, you can rez them when you rez your set or just have them in the contents so you can always find them if you need to.

Decide what plan and back-up plan works for YOU and stick with it.  Consistency makes things much easier!

But wait, why put them in the Stage Manager and rez them with my set?  You still get one of the best benefits of backstage movers – your dancers can finding them easily without hunting around on your set!  Rez your set and movers, active the Backstage Position routine, have your dancers jump on their pads backstage, then load your dance routine on the PD to put them into position.

Use your Backstage Position routine again and again!

Almost every venue I perform at, I use the same Backstage Position routine.  Most venues are set up with the same area behind the stage.  I create my dance like I normally do, then I just add my backstage routine notecard to the PD and the backstage mover notecards to the movers.  Done!  I can use this same Backstage Position routine at Phoenix, Winds, Elysium, Paramount, TerpsiCorps, Moonstone, etc.!

How you say?  Your stage manager knows the center position of your venues.  Most venues use the same size set template with the backstage area behind.  The Backstage Position mover notecard knows how far away it should rez from center stage – making it incredibly easy!  Set it up for a dance at Elysium and bam!  You’re ready to use it and perform at Phoenix too!

Wait – what if the venue has a different backstage area – like Noir or Inanna?

Create another set of Backstage Position notecards.  Store them in a separate separate directory and keep the same name, or create a new name for them – like:  Noir Backstage Position.  It’s up to you!

For me, I use a Backstage Position routine and an Understage Position routine.  I like to keep my movers out of the way when we aren’t standing on them or sometimes I like to chill with my dancers understage – especially venues where backstage gets a bit crazy!  I just repeat a similar process to create the Understage Position routine, and my movers have 3 notecards – Backstage Position, Understage Position, and my dance.  Again – do whatever works best for you.

Tips and Tricks:

  • I don’t put my movers in a rezzer.  I take a “soft copy” of all the movers at the same time and store them in my Dance folder in my inventory.  When I arrive at a venue, I put out my stage manager then I rez out my movers – doesn’t matter where.  On my Performance Director HUD, I click on the Backstage Position routine and they automatically zoom to their backstage position.
  • After I’ve created my performance movers, I just drag the backstage mover notecard for the appropriate mover into them.  Remember that dancer 1 should get the dancer 1 backstage notecard, dancer 2 the dancer 2 backstage notecard, etc. (so your dancers don’t stack on top of each other backstage!)
  • I have a “New Dance” folder in my inventory.  In this folder I have subfolders for Performance HUDs, Performance Rez, Choreo, Costumes, Tools, Notecards, and zMisc.  When I begin to create a new dance I make a copy of this folder and rename it with the name of my dance.  Within this, in my Tools folder, I have a designer ring, in the Performance Rez folder, I have a Stage Manager pre-loaded with my stage locations, standard blank set, and prim lights I often use.  In the Choreo folder I have a Smooth Dancer HUD I’ve resized so I can fit 2 high on my screen.
  • Also within this new dance folder, in my Performance HUDs subfolder, I have a PD preloaded with my Backstage and Understage routines and the animations I like to use as a “start/idle” pose for those.  I save a lot of time having everything ready to go and pre-loaded as much as I can.

I hope you find this process easy to follow and that it simplifies preparing for a performance!

Happy Dancing!
~ Eva


Questions  

Q:  I have stage manager, but I don’t use it for my sets.  I want to create these Backstage notecards, but do I have to rez my sets from the stage manager?

A:  No!  You must have a stage manager, your stage manager must have the platform/venue locations in the stage location notecard, but you DO NOT have to rez your set from it.  Just place the stage manager anywhere at the venue and it will act like a “GPS” for your movers.

An alternative is to use the Stage Marker which comes with the Performance Director.  It is the pre-cursor to the stage manager, works similarly, and bases where movers go based on its location – not a list of venue center positions.  Additional note on the stage marker:  If you add ! to the beginning of the name, it will rez first out of your rez box.


Q: I created my Backstage PD notecards, but what do I do with the designer rings?

A: Delete them.  You only needed the rings to get the information for the notecard – they’ve served their purpose.


Q: I never dance with more than four dancers – do I have to create these Backstage PD notecards for 8 movers?

A: No.  You choose, just make sure your PD notecard lists the same number of dancers that you’ll create mover notecards for.  I use 8 because that’s normally my maximum and the maximum default slots for the Performance Director.


Q: My dance will only have two movers, but the Backstage notecard in the performance director lists 8 dancers.  Do I need to change it?

A:  No.  I frequently dance with less and never change the Performance Director card.  If you do get a warning about dancers 3 – 8 not being present, just ignore it.


Q.  I followed these instructions but it’s not working!

A.  Check the following things:

  • reset your stage manager.  Does it say it’s configuring for your stage or does it say it can’t be used until a stage location is set?
  • Check your movers and your PD.  Are the names EXACTLY the same?  Don’t add any numbers, they must be IDENTICAL.
  • Check your Backstage PD notecard in the movers.  Does it have a dancer number listed?  Do you see the offset information in the bottom section?  It will say offset and a bunch of numbers, and this will be right after #BEGIN NOTECARD and before the information for your first waypoint


Posted in Dance Resources, Uncategorized | Leave a comment

Challenge: May 29

20180529_tai chi

Words for Today:

FOCUS

BALANCE

ORDER


Background:

5/29 post, my challenge for myself:

To help keep me moving forward, working past challenges and to discourage me from hiding in my protective shell, I will capture a special moment each day…something different, something not for a good photo’s sake, but something that is part of my goals and creativity.

Posted in My World | Leave a comment

Working through setbacks, procrastination, and a challenge

It’s hell sometimes, being an emotional creature – but then again aren’t we all in our own way?  I think the key is how we handle it, how we work through it.  I’ve read that men work differently than women.  The article said that men do what they need to do, women do what what they feel needs doing at that moment.  That seems like an overly simplistic generalization to me, but ha…in my case it’s sometimes (ok, often) true.  Sometimes it’s out of necessity.  I believe we are all in this world for a reason.  Some days, just functioning is a challenge, some days it’s to feel a sense of normalcy in a chaotic world.  Most days it’s because I can create in ways I never could in RL and meet people whose paths I would never cross other than here.  The opportunity to meet others, to connect at a level almost impossible in RL, who you can relate with – those innermost thoughts and ideas, feelings, beliefs, and dreams.  There is a danger in this however, for I find that in this world connections come faster and more intense because the physical boundaries are stripped away.  Everything is truly mental here isn’t it?  My words often spill straight from my mind to my fingertips without conscious thought.  Shields often lowered or sometimes even non-existent.  This makes it too easy at times to open, and to trust.

In RL, I must hide that I am pagan.  Where I live, where I work, even in this day and age would cause me to be shunned.  Like many of us, I’m so often misunderstood, wonder if anyone truly knows or understands me.  In this world, I can be who I am…though even sometimes still I surround myself in a protective shell.  I respect and honor everyone’s beliefs as long as they don’t harm others without consent.  This verse threads through my mind today:

“Beware of false prophets, which come to you in sheep’s clothing, but inwardly they are ravening wolves.”

Ahh…now I wonder, we’ve all been burned at one time or another.  Where is the balance?  When do you know who to let close, and when should you keep your protective distance?  When does it become something all consuming that diverts you from your true goals, or a frame of support that helps you fly?  What if you can’t tell the difference?  I wish I knew.

Emotional balance and focus are sometimes very real challenges for me, and when my sense of ‘normalcy’ or order is thrown out of whack, it takes me a while to re-stabilize mentally.  This brings me to my original thoughts on this post.

How do you work through setbacks?  I looked on the web for a little insight.  Everything printed on the internet is always true, right? ha 🙂

It was enlightening to read about different types of obstacles we may face, kind of categorizing them.

There are setbacks – defined as hiccups or speed bumps.  Make things harder, but don’t really stop you.

Then there are roadblocks – like tar paper…or like those sticky fly strips that threaten to get you stuck.  Stop you moving forward, may prevent you from accomplishing something.

Then there are defeats – the life changers, the things that totally blindside you, knock you out, and make you doubt if you want to get back up again.

The article gave five things to do that can help keep moving forward.

  1. give yourself time
  2. don’t panic
  3. make peace with your “failures”
  4. cut yourself some slack (but don’t let go of the rope)
  5. regain your control

I realize I write about procrastination fairly often, because it’s one of my defense mechanisms, and also a weakness, the desire for immediate gratification.  I can prepare for what I need to prepare for, or I can play with this shiny new thing over there….  That immediate gratification makes me feel good.  Sometimes doing what I need to be doing is scary and overwhelming if I let it be, so I’m drawn to the shiny things.

I know I don’t always understand myself….or have I ever?  Are we meant to, or is that part of our journey through this life?  To keep learning.

My challenge for myself:

To help keep me moving forward, working past challenges and to discourage me from hiding in my protective shell, I will capture a special moment each day…something different, something not for a good photo’s sake, but something that is part of my goals and creativity.

There’s room for the shiny things too, but I’ve also known for a long time that I get in my own way of succeeding.

A place for everything, and everything in its place.

Namaste,
~ Eva

20180529_tai chi


Article that I referred to above:
https://www.fastcompany.com/3060410/how-ive-learned-to-deal-with-setbacks


Posted in Musings | Leave a comment

continuing on…I may be in love

organized abstract manner

I just have to chuckle…if I’m in love I really am pretty fickle – always looking for the next best one…

If you’ve read my previous post, I’m talking about animation organizers – not men!  Although I must admit I’m a rather free spirit in that department too. 🙂

PickA!_Add2
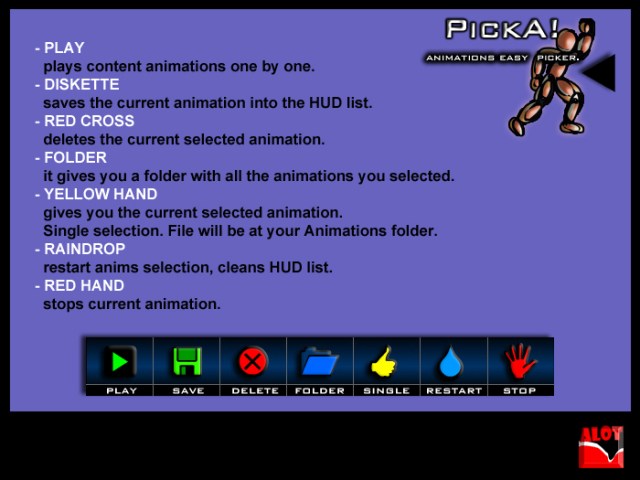
So, I was intrigued and purchased the PickA Animations Picker for 275L the other day.  Blog post here.  Basically it’s a script you can put into a prim, and it will play all of the animations, let you click on the disk to “save” the ones you like, then can give you a folder of all of the liked ones.  You can also make the prim into a HUD.  Because it’s a script I can put it in anything and it automatically plays through the animations…which might be a good or bad thing.  Sometimes I need to let the animation play some to see, sometimes I know instantly it won’t work, and sometimes I feel extremely lazy and don’t want to click through them all.  Will it go through them too fast?  Can I adjust it?  Would it work for caching animations in an organizer?  Maybe this would be good for poses?  Because it’s a script, I could create my own multi-button hud, organizing my poses and non-dance animations.  (If you can link and unlink prims – you can create your own multi-button hud too!)  This one is the first I’d ever noticed with the “save” and give the whole folder of “liked ones” or just the single animation, so this was really exciting to find…but then…

_BOOM__Animation_Station
This is the system which I use now, and which completely revolutionized how I pick my animations for choreography.  Each of the numbers represents a category for dances – style, store, however I want to organize them.  I can label the buttons, retexture them, and even unlink a number block, copy it 10 times and relink them – so it’s incredibly expandable.  Each block can store over 200 animations, although I try to keep it to around 100 – that’s a lot of scrolling!  If I like an animation, I click on the number, and it will give it to me, then I dump them all from my inventory into my Smooth Dancer HUD.  I adore my boom station for dance animations (not so much non-dance animations).  It’s my favorite purchase in SL – not bad at 450L and copy mod!

_NDS_Animation_Manager(en)

I must say though, after trying this animation manager out I may be tempted to switch!  It’s really hard to find on MP – I had to search animation manager to find it.  It’s listed under Recreation and Entertainment Scripts, but it’s not – it’s a nice looking gadget, a good size black square you stand on with clean buttons.  I’ll post a picture of it when I can.   There’s an inworld store if you’d like to play with it.  There is also a demo on MP – the buttons are in Japanese but it’s not hard to guess what’s what!  I do like that it has a stopwatch..because sometimes I like to count how long an animation moves the feet, how long before it hits a certain move, etc.  This could be extremely helpful for layering animations.  I like that it can also let me flag the animations I like then give me one folder, instead of individual animations.  I can’t remember what the limit of categories are but it was a good number, but it’s also copy/mod so I could have multiple.  I’m not sure what the category notecard means yet…I like efficient and easy, so I’ll have to see what that means.

A.E. Animation Picker HUD

There’s one more I’m thinking of.  This one is a hud with 5 or 8 slots.  Cycle through with the left and right arrows, and press the down arrow to get a copy of the animation.  This one is only 99L and I think might work well for walks/runs/jumps/lands, etc. that I often want to choose on the fly while I’m working on dance choreography.  I’ve struggled with how to organize animations that aren’t dances – I must have over 1000 from Kuso, and while the animation is labeled run, it can actually be flips.  I know I’m not using my non-dance animations as well as I could.  Depending on how long an animation plays or if it’s adjustible in the PickA Animations Picker script the top, that may be the best solution for non-dance animations.  Hmm…

I started with organizing my animations in dance huds, but the numbers of HUDs kept growing and I’d write down the animations I liked, then had to go find it inventory, then moved it to a folder.  Moving to the boom station, I found it so much faster to choose my animations and because of how they’re organized, I’ve also become so much more familiar with them.  As I was organizing, I also found a ton of animations I didn’t realize I had!

I think re-evaluating what you do, how you work periodically is an excellent thing to do.  Sometimes how you’re doing things works really well and might just need a little tweak or keep things rolling as you are.  Sometimes you can introduce a new tool, new methods, new flows that help you really focus on your creativity.  If I decide to move to a new tool – I need to take into consideration the time to transition, and NOT do it when I have a dance I need to finish!  (Yeah, procrastination flag here – playing with the new shiny toy!)

I originally started looking because of my recent workshop on animations, transitions, and organizing animations.  That was a great workshop with lots of input and feedback from everyone, and we had fun freestyling and noticing the transitions!

One thing I learned too?  I think I tend to fall back on the same animations even though I have a good variety and mix from every dance animation store I know.  Time to expand my horizons a bit!

To sum it up:

  • new gadgets AREN’T always the answer
  • I’m kinda geeky and OCD in some ways…that reflects on what I do.  Always do what works for you 🙂
  • don’t let shiny new toys distract you from creating.  You could have the best organized animations – and no dances!
  • periodically look at how you do things.  Is there a “pain point” – something that you struggle with/feels awkward?  Look for alternatives in the way you do it!
  • Have fun!

I hope y’all enjoy an amazing day…and keep dancing!

~ Eva “no…not touching the new toy…not touching the new toy…not touching the…” Harley

Posted in Musings | 2 Comments

I may be in love!

Noooooo!  Not that kind of love!

I love gadgets and efficiency, and if this script does what it says it does, I may have to marry it!!

  • So…you put your animations in an object.
  • You add this script to it and when you click on the object you get a menu.
  • It will play all the animations in the prim one by one.
  • If you like the animation you click the disk button.
  • When you’ve picked from the animations in the object, it gives you a folder of all the animations you selected….

I love my Boom station animation organizer…but I do have to click the arrows to change animations and receive the animations one by one.  I wonder if this will save me time?  Maybe it would work better on things like flips, runs, and poses?

If it can go into a prim, does that mean I can put it in my individual boom station prims (numbered blocks) where I have my animations – dance and others – sorted?  Or even a Smooth Dancer HUD maybe?  I wonder how long it plays the animation?  It’s a copy script, so I can always delete it when done.

Hmm….will keep y’all posted!

PickA!_Add2


If you’re curious, link is below, but I have no experience with it…yet!  Will be giving it a try out with my Riddler walks and kicks.

https://marketplace.secondlife.com/p/PickA-Animations-Picker/3890278

Posted in Uncategorized | 1 Comment

Trigger HUD workshop has been rescheduled!

Trigger HUD workshop has been rescheduled!

We’re back and ready to go at 5 pm today (Mon 5/14)!

Our focus is how you can easily create your own hud to trigger curtains, particles, fades, and other changes – and a discussion of why this can be extremely helpful!

I hope you are ready as we’ll be building two huds today as we trigger the magic in your magic hat and magic box!  Sure to be fun and educational!

We’ll be working in the Build Studio:  tp here

Please arrive early for unpacking the class supplies and setting up!  Sim will be closed when the workshop starts.  Look forward to seeing you!

~ Eva


PSA – no heads will be set on fire during this workshop.  I promise!

Posted in Uncategorized | Leave a comment

Trigger HUD Workshop for today has been postponed

I just received a call from my internet provider that they are coming to service my cable lines – arriving between 11 and 12.

Because of this I’m going to reschedule this workshop to avoid the expected disruption.

I apologize and hope to see you soon!

~ Eva

Posted in Uncategorized | Leave a comment

The Act of Creation – Kill of the Night, Post #3

It’s time to start pulling the animations.  Actually, I lost a few days in there so I *really* need to get my butt in gear!

I have my own method and rhythm for creating choreography for a dance.  It works for me and because I follow the same general process every time, once I get started it usually moves right along.  Choreography is usually my favorite part of creating a dance – most days!

I’m sharing how I do it here.  As I often say – take from it what you will!  Maybe you’ll be inspired to tweak your method, or you might make a face and go…uhh…lol!

Step 1 – Get the music:  I purchase a copy of the music from Amazon if I can.  Sometimes I’m using a special mix or a version of the song from YouTube that isn’t available for purchase.  I always download it and have a file, no matter where I’m getting the music from.

Step 2 – Get the music player ready:  I open my file in TROFF or whatever music player you’ll be using.  I like TROFF and Audacity.  In both you can add markers (labels) where the chorus is, slower sections, etc.  This helps me when I’m choosing animations.

Step 3 – Get my costume on.  For women especially, dance animations can look very different depending on the costume.  If I haven’t finished my costume yet, I wear something similar.  Flowing skirt – leather straps – hiphop outfit, etc.

Step 4 – Starting picking from my current dance animations:  Time to start selecting!  Most everyone has different ways they organize their animations.  Maybe you have yours in a HUD – one for country, one for hip hop, etc.  Maybe you open animations from your inventory.  Maybe you have pose stands.  I use what’s called a “Boom Station”, which basically has a stand pad and buttons where I can organize my animations.  Mine are organized by store – or for stores where I have a lot I organize by store and type/pack (like Abranimations S2 Ballet).  There’s no wrong way to do it – just whatever works for you.

So, with my Boom Station, I can press arrows to go through the animations loaded in each button, and hit the number if I like an animation for the dance.  I make quick decisions – if I think it might work, I pull it knowing I’ll whittle them down later.  When I hit the number, it gives me a copy of the animation.  When I’m done picking, I’ll load them all into a Smooth Dancer HUD to start working on my choreography.  This is my way – use whatever way works for you to test your animations and collect them so you can put them in a choreography HUD!

After working more with layering animations in the Performance Director, I was surprised to notice I automatically started looking at the animations differently.  For a few, I wasn’t thrilled about the beginning of the animation but it had cool moves shortly after the beginning so I grabbed those too.  We will see!

Step 5 – Load the animations in a Smooth Dancer HUD for choreo:  I put the animations I picked into a single Smooth Dancer HUD.  I rename my HUD to CHOREO <name of the dance> then leave the Smooth Dancer..blah..blah..blah…version number.  For this dance it will be CHOREO KillNight Smooth Dancer..and the rest of the original HUD name.  I find I can copy about 20 animations into the HUD at a time.  Much more than that, and ye old “In-world object creation failed” error pops up – which means at least one of them didn’t copy.  Easier to just do 20 at a time and avoid that.

Step 6 – Buy a few new animations to add:  I try to purchase two or three new animations for every dance I create.  This was an excellent tip passed on to me that I’ve continued – it helps keep my animations “fresh”.  Sometimes a piece of music also needs something that I just don’t have in my own animation inventory.

This is where I go shopping.  I try not to go overboard, limiting it to just a few new purchases.  If I’m not careful, this can become a major procrastination tactic for me – spending my entire day going to the stores looking for the “perfect” animation or trying out all the new animations or checking out their animation sales and events.  On occasion I do need something specific, but most often I’m just procrastinating…

Note about Dance Animation Stores:  Just like dance venues, dance animation stores have their own “vibe” and style.  Abranimations is where you can get mirror animations, they generally have a lot of new releases and their animations are great for smoothly transitioning into and out of other animations.  Sync’ed has a lot of new releases and some that are very expressive.  Some are kind of “clubby” which doesn’t usually work for me, so I know I need to sort through a bit there.  Some stores have great animations but aren’t creating any new ones – like S4D.  MyAnimation has good animations – they’re all sorted by type of dance.  A&M has good animations and comes out with new releases though not as quickly as Abram and S4D.  They have excellent couples dances.  Henmations has some good ones too, although I find the unisex ones are still pretty feminine.  I haven’t seen new ones come out there in quite a while.  These are just some of the dance animation stores.  When I’m looking to add a few new animations for a dance, I keep this info in mind when deciding where to look.


OK, now that I’ve written all of that, what am I doing?  I’m in the process of picking animations from my Boom Station.  Usually I can finish this within a day.  I do find that I need to take breaks periodically, otherwise the animations will all start blurring together or the process becomes something I just want to get done.  When I get to feeling like this, it’s a red flag that I need to stop for a while, then come back when I’m refreshed.  My dance will be a lot better if I take a breather, and I’ll enjoy the process a lot more.

Dance like there’s no tomorrow!  Until next time….

~ Eva

Posted in Act of Creation | 1 Comment

Dancers Particle HUDS – Activate with a chat command

Particle Tip:

If you own the Dancers Particle particle HUDs called Cyber or Dancing, you can activate the particle without wearing the HUD.  You can use the HUD or a chat command – which means you can add it to your performance timeline, a trigger HUD, or a hot key button.

To activate a particle after rezzing out the emitter (the emitter is where the particle comes from, so you do have to have that):

The channel is 55.

For the Dancing particle emitter – type D and the particle number.  Example:  D01, D05, D12, etc.

For the Cyber particle emitter – type a C and the particle number.  Example:  C01, C05, C12, etc.

To stop the particle, the command is Particle Die.  Example:  /55 Particle Die
* note: this stops all of the particles on both emitters.  You can’t stop just one active particle.

Bonus with using the chat command:  Using the HUD you can only activate 1 particle at a time from each HUD.  Using the chat commands, you can activate multiple particles – but when you stop them with Particle Die it will stop all of them.

I have always recommended these HUDs for dancers, especially dancers new to particles.  Having a chat command makes them even more versatile!

If you have an issue let me know.  Have fun and light up the world!

~ Eva

Posted in Dance Resources, Uncategorized | 1 Comment