
These tutor notes are intended for attendees of this Harleyquin workshop. The benefits of making them available via the web outweigh the likelihood that others may stumble across them. If you have not attended this workshop, please consider attending or supporting Harleyquin Workshops. More info HERE
NOTICE: This information is intended for personal use only. It is not to be duplicated for any other purpose or distributed. Please respect the time and effort put into Harleyquin workshops within the dance community of Second Life.
Tutor: Eva Harley (EvaHarley Resident)
Last updated: 10/10/2018
Workshop Summary:
Seemingly simple, textures can make the difference between a well designed set or one that distracts or even detracts from your dance. Our focus today will be how textures can be used for set design, but many aspects can also be applied to costume.
During this workshop we will explore quality, scaling and offsets, 3D textures, how textures can effect lag, and more.
Workshop Flow:
- It’s a grey, grey, world
- Bigger isn’t always better – texture sizes explained
- Scaling textures – keeping it real
- Texture offsets
- 3D textures and how to use them
- How textures can affect viewer-side lag
- Tips, tricks, and tools
Workshop Notes:
We all know the feeling and the frustration of teleporting into a new location and the world is grey, even the people. As we beat our head against the keyboard mumbling “why, why, why???” and yell at it to hurry up and rez (which thankfully no one can hear), there are reasons why this occurs and ways you can minimize this for your own sets.
Textures – most of us probably find one we like and slap it on our set wall, or a chair, or the 50 rocks we add to our set. As long as SL will upload the texture we want, we’re happy right? Darn that “your texture must be less than 1024 x 1024 and less than 1 mb in size message”.
There is actually a great reason for that. When you land in a new location, your viewer reads all of the textures used within your draw (view) distance. For each texture, your viewer collects this information from the SL servers then displays this texture on your screen. The texture information is also automatically saved in your texture cache to make it faster for next time.
Texture Sizes and How Textures Effect Lag
Scenario: You walk into the hottest new club in SL (ok, hair event). You are ready to hit the ground running…BUT…everything is grey. You can’t see anything. When you landed, your computer processor and hard drive started spinning in high gear and it sounds something like this:
your viewer: “ooh! new texture…SL send me the info for this texture so I can see it!”
SLs asset server: “sheesh..fine. Can’t you see I’m busy? here.”
your hard drive: “beep..beep..boop…saving it into texture cache folder now”
your hard drive and viewer in unison: “noooo…another 1024 px texture…ugh this is heavy. Have some self control people! This is gonna take a bit…”
your viewer: “yay! I can see..umm…that one thing…”
your viewer: “ooh! new texture…SL send me the info for this texture so I can see it!”
…..and repeat….
The greater the number of textures and the larger the image size used, the longer it will take for your viewer – and anyone else’s view – to see them. Your computer video card and speed will also have a significant impact, as will your graphic settings. Advanced lighting, shadows, draw distance all control how much information is used by your computer to “render” what you see.
Texture size is represented by the number of pixels or “dots” that make up the image, much like a television. The higher the pixels in the image, the more resources and video memory will be used. The more resources used to display the textures around you, the less that is available for other things such as moving, animations, texture changes, etc. Avatars are also comprised of textures, so they may also appear grey or not visible at all.
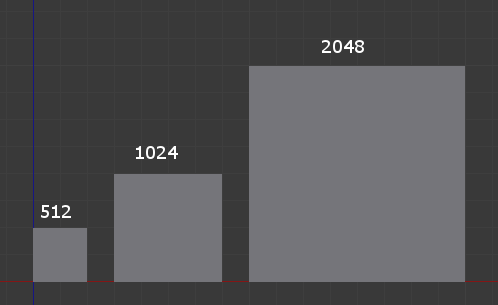
When choosing textures, you should generally try to keep your image sizes as small as possible without losing quality. If you are texturing a small vase and uploading your own image, consider using 64 px or 128 px sizes. These will render much faster and often give you the same visible quality as a larger size. Bigger is not always better, and size does matter. It is almost never necessary to use 1024 px images. Many assume this gives a better quality texture to an object, while really what it does is increase lag. Always strive to use 512 px or less when possible.
One thing that makes Second Life unique, compared to World of Warcraft let’s say, is our ability to upload textures into the game. Most multiplayer games are created by game creators who control the number of images which are highly optimized so that the game runs as quickly as possibly. Here in SL, everyone has the opportunity to upload their own images. (and yes, sometimes we always wonder why someone would pick that texture)
Game creators generally follow the “Rule of 2” when creating images for games. Images are two dimensional – height and width. To optimize textures for quick loading, they use textures that conform to the following sizes: 8, 16, 32, 64, 128, 256, 512, 1024 for height and width. So a texture that is 256 x 256 px is optimized for faster loading. There will always be times when you won’t want to follow this “rule”, such as when you’re uploading narrow textures, portraits, etc. By considering the principles of texture size when you use textures in SL, you can help improve the audience experience and your own.
Image Quality
When choosing a texture, always choose images that are sharp will good color. A blurry image can destroy a beautiful set. Always pay attention to corners and strive to have edges that flow from one to the other. People will notice if your left wall has half a tree and the middle wall has no tree at all. Cam back on your set and look at it objectively. Where is your eye drawn to? Is it drawn where you want it to be, or is your focus automatically drawn to clouds that are chopped up, blurry, or pixelated (choppy looking)?
Scaling
Texture scaling is stretching or shrinking the texture, the number of times the texture will repeat over the face of the object. Example: you apply a brick texture to a wall and the bricks look the size of of television sets. By changing the number of repeats of the texture which adjusts the scaling, you can adjust the bricks so they look reasonable size.
Scaling is one thing to always watch when you texture a set. If you apply a leaf texture to your stage floor, the size of the leaves should look realistic. If they are the size of dinosaur feet, change your scaling! This can severely detract from your performance!
<image here>
Texture Offsets
Texture offsets give the ability to adjust the section of the texture to be displayed. You can adjust the texture so that it shows only the right edge of the texture, or is shifted up or down to capture a certain section of the image on your prim. This can be very handy when adjusting prim edges.
<image here>
3D Textures
3D textures use a fairly recent ability added to SL – advanced lighting. 3D textures use three different “layers” to give a more realistic look to the prim by simulating roughness and light reflections.
To obtain a 3D look, 3 textures are used:
- diffuse – this is the primary picture, color, lines, shape, etc.
- normal – this is a special texture that gives the appearance of a detailed surface with all its bumps and roughness
- specular – this layer creates the shine, reflections on the surface, and how rough and smooth they will be.
Advanced lighting must be enabled to see the 3D effect.
3D textures will come with all 3 types of textures which must be applied to the object under the texture tab.
<insert images here>
Before you apply the normal and specular layers, adjust your texture – offset, stretching, shrinking, etc. After this is complete, apply your normal layer and specular layer, then press the button “button name”. This will align the three layers, making the settings the same so that the shadows and shininess match up with your main texture.
<insert image here>
Additional information:
- 1024 x 1024 is the largest image size SL will upload. 1 mb is the largest image file size it will upload.
- if your image is greater than 1024 x 1024 in size but less than 1 mb, SL will automatically adjust the pixel size when you upload.
Image Programs:
There are many different image programs, Paint and Gimp are both free programs that can be used.
If you prefer Photoshop, they do offer a monthly subscription service as an alternative to buying the software. More info here
(note: the pricing seems to have changed since I subscribed, and I don’t believe mine came with online storage. I personally prefer Photoshop and receiving the automatic software updates without buying the software so this was my choice.)
Gimp: free website
Paint (or Paint 3D) – included with Windows
Paint.net: free website
Article: The best free photo editor 2018
As always, choose what option works best for you!
An interesting article on texture sizes: The Power of Two
